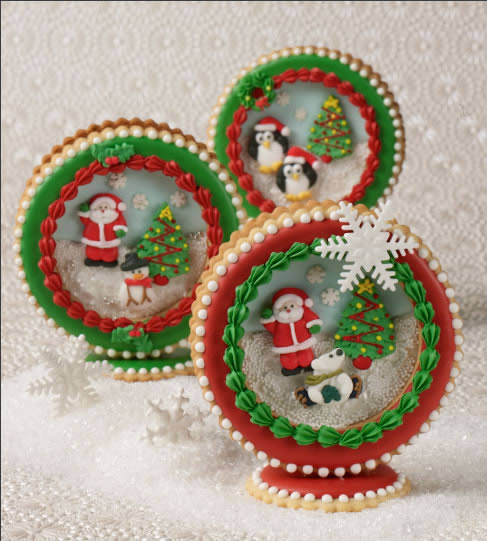
A flurry of snowflake confetti, sanding sugar, and nonpareils adds sparkle to these fun yuletide favors. You can make your own Royal Icing figures for the central vignettes or, to avoid the holiday rush, use readymade decorations as pictured.
Many years ago, author and cookie decorator extraordinaire sent us this recipe/article/instructions for these absolutely amazing snow globe cookies. Enjoy!
by Julia M. Usher
From the book Julia Usher’s Ultimate Cookies
Prep Talk: Either dough, below, works well for this small-scale 3-D construction project. Just be sure to mix and chill the dough as instructed. If packaged in airtight containers at room temperature, this project will stay its best about 1 week.
Makes 6 (2-1/2 x 4-1/8 x 4-1/2-inch-tall) snow globes
You will need
- About 1 pound 5 ounces (1/2 recipe) Cutout Cookie Gingerbread (p. 236) or (1 recipe) Signature Sugar Cookie Dough (p. 234)
- 12-piece fluted round cookie cutter set
- 12-piece plain round cookie cutter set
- About 3 cups (2/3 recipe) Royal Icing (p. 242), divided; quantity will vary
- Soft-gel food colorings of your choice
- Small craft paintbrush (handle about 1/4-inch diameter)
- Parchment pastry cones (p. 13)
- A few tablespoons sanding sugar, nonpareils, and/or edible glitter (p. 26)
- Assorted small (1/2- to 1-1/4-inch) readymade royal icing embellishments, such as santas, snowmen, penguins, and Christmas trees, for central vignettes
- Snowflake sugar confetti
- Assorted (2 to 3 mm) dragées or sugar beads
- Pastry bag fitted with tip of your choice, for borders
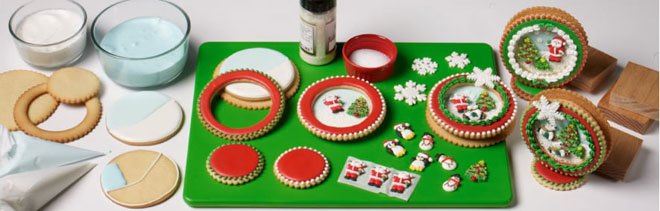
Short and Sweet. (a) Top-coat (or outline and flood) the cookies for the central vignettes, bases, and rings. Add Royal
Icing dots or other borders to the edges of the bases and rings. (b) Glue a ring around each central vignette cookie with thick Royal Icing. Use an assortment of readymade royal icing embellishments, sugar confetti, and other decorations to create a wintry picture within each ring. Reinforce the back of each vignette with another round cookie. (c) Pipe a border on the inner edge of each ring. Use thick Royal Icing to stand up each vignette on a cookie base. Prop until dry.
Instructions
- Cut and bake the snow globe pieces. Each snow globe will be comprised of 4 cookies: 1 (3-1/2-inch) plain round cookie for the central vignette; 2 (4-1/8-inch) fluted rounds (the first cut into a ring to frame the central vignette; the other left solid to reinforce the back of the vignette); and 1 (2-1/2-inch) fluted round for the base. On a lightly floured surface, roll the dough to a 1/8 – to 3/16-inch thickness. Start by cutting out the 4-1/8-inch fluted rounds and rings. It’s best to cut the latter directly on prepared cookie sheets to minimize the misshaping that can occur in transferring from work surface to cookie sheet. Cut out 12 rounds with the 4-1/8-inch fluted cutter; then cut out a window in the center of half of the rounds using a 2 7/8-inch plain round cutter. Reroll the remaining dough to the same thickness and cut out 6 (3-1/2-inch) plain rounds and 6 (2-1/2-inch) fluted rounds. Group likesize cookies on the same cookie sheet. Bake as directed until lightly browned around the edges, or about 9 to 11 minutes for the 4-1/8-inch rings (or frames) and 2-1/2-inch rounds, and 11 to 13 minutes for the 3-1/2-inch and 4-1/8-inch rounds. Cool completely before decorating.
- Prepare the Royal Icing as instructed on page 242. Reserve about-1/2 cup for beadwork,-1/2 cup for “glue,”-1/4 cup for flocking (aka sanding), and-1/2 cup for inner borders on the rings. Note: The quantity of icing will vary with the number of colors and consistencies mixed. It’s best to allow no less than 1/4 to-1/2 cup icing per color or consistency for easiest mixing and handling.
- Top-coat the bases, central vignettes, and rings. Divide the remaining 1-1/4 cups icing into as many portions as you want top-coating colors. For this quantity of icing, I limit the colors to three: pale blue for sky and white for snow on the central vignettes (3-1/2-inch rounds), and another color, such as red or green, for the bases and the 4-1/8-inch rings. (Note: It isn’t necessary to top-coat the solid 4-1/8-inch rounds; they will be used as props to keep the vignettes from leaning and will not be seen in the final construction.) Thin each portion to top-coating consistency (p. 245). Using the handle-end of a craft paintbrush, apply a smooth coat of icing to each cookie top. For top-coating technique details, see page 28. As noted earlier, I usually ice the bottom halves of the 3-1/2-inch rounds in white and the top halves in blue, for snow and sky. For greater control over the placement of these icings, outline each area first and then flood inside, as pictured in “Short and Sweet.” Let the icing dry until very firm.
- Add dots to the outer rings and bases. Tint the 1/2 cup icing reserved for beadwork to a color that complements the top-coating colors; then thin to the proper consistency (p. 245). Transfer the icing to a parchment pastry cone and cut a small (1/16-inch or more) hole in the tip. Pipe small dots around the outside edge of each 2-1/2-inch base and each 4-1/8-inch ring following the instructions for beadwork on page 34. (Alternatively, choose a different border from among those listed in “7 Essential Piping Techniques,” p. 46.) Let the icing dry to the touch.
- Frame and create central vignettes. Use the-1/2 cup icing reserved for “glue” to tack a ring onto each 3-1/2- inch round, taking care to center the rings on top. Create a holiday-themed vignette inside each ring by flocking (aka sanding) areas with sanding sugar, nonpareils, and/or edible glitter and then gluing readymade royal icing embellishments, snowflake confetti, and/or dragées or sugar beads on top. Note: I usually flock the bottom half of each round with white nonpareils and edible glitter to mimic snow. To flock, thin the-1/4 cup icing reserved for this purpose to top-coating consistency and spread a thin layer on the area to be flocked. Sprinkle nonpareils or sanding sugar over the wet icing and shake off the excess into a bowl. For more flocking technique details, see page 42. Lastly, glue a solid 4-1/8-inch round to the back of each 3-1/2-inch round, so that the 4-1/8-inch ring and the 4-1/8- inch round line up.
- Add borders to the inner rings. Tint the-1/2 cup icing reserved for inner ring borders to a color of your choice and choose a border style from among those listed on page 46. Adjust the icing to the appropriate consistency for your border and transfer to a parchment pastry cone or pastry bag fitted with the right tip. Proceed to pipe a border around the inner edge of each ring. Note: I piped a Trailing Star Border (p. 47) with thick icing and a pastry bag fitted with a 1/4-inch star tip (Ateco #18 or #27).
- Assemble the snow globes. Work on one snow globe at a time. Glue a framed cookie vignette upright to the center of a cookie base using as little icing “glue” as possible to keep it from showing. Prop the vignette, as needed, until the “glue” is dry. Repeat to assemble 6 snow globes in total. Do not move until completely dry.
Variation: Name Dropper
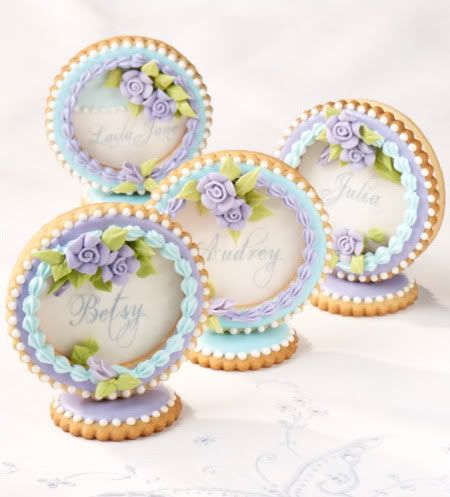
Snow globes can go from frivolous favor to polished place card simply by swapping the readymade royal icing figures for mini roses and names printed on wafer paper. Here, I’ve used an elegant script font called Eutemia I, flowers from fancyflours.com, and Royal Icing leaves piped with a 1/4-inch leaf tip (Ateco #352).
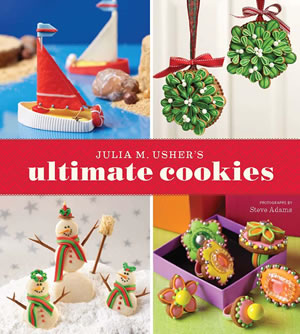
Julia M. Usher’s Ultimate Cookies by Julia M. Usher
Delve into the world of cookie magic, where you can make everything from edible jewelry to cookie bacon and eggs! Organized by theme, each chapter overflows with luscious photographs and dozens of recipes and cookie crafting ideas. With carefully illustrated details, award-winning author Julia M. Usher expertly guides you in the making of perfect cookie masterpieces. Photographs by Steve Adams. Published by Gibbs Smith, 272 pages, ISBN 978-1423619345 . Order now…